Tuesday 21 December 2010

Makerbot Cupcake bits


I bought a Makerbot kit the other day, and had lots of fun building it -- reminded me of playing with Meccano when I was a youngster.

At this stage of evolution, setting up these hobbyist 3D printers is a bit of hit-and-miss - so I'v ehad endless trouble with Z-wobble. (For the interested, the Z-axis, which goes up-and-down with the extruder to give the models you print some height, is moved by four leadscrews. It's really hard to get them centred in their bearings, top and bottom, so some wobble is inevitable. Unfortunately, in my case, the wobble causes the Z-axis to jam, with unfortunate effects.)

One solution is to allow a bit of compliance in three of the leadscrews (that's an engi
neering term for slop), so I made up some two part nut-holders out of fluorescent red 3mm acrylic. Usual stuff --
inkscape the drawing, change the line width to 0.01mm, save as .pdf and cut on th
e
laser cutter.

Here they are, already for supergluing together, and mounting on the leadscrew just below the Z-stage platform.

Memo to self - next time, make the round holes 9mm, not 8mm, and cut out an 8mm slot so I can slot them on without dismemberi
ng the (somewhat finicky) leadscrews.


Saturday 4 September 2010

Handling a kite string


There's nothing better on a hot summer day (or even a cold winter's day) than flying a kite - preferably a big one, with lots of control, and lots of pull.

There's nothing worse, on such a day, than having to untangle a kite string, either before you fly, after you fly, or some time in the middle.

I've had a variety of kites over the years, but my favourites at the moment are big parafoil ones - I've got a 2.2m span and a 3.1m span - they are awesome toys.

Each of them has four control strings - two to steer left and right, and two to control the power, so the tangle-opportunity is frightful.

The kites arrived with their string wound on a small winder (see "before" picture) - and all the strings already tied to the kite bridles and to the control handles. This is a good way of avoiding most of the string tangles, but I prefer to wind things up in a figure-of-eight rather than a straight loop (it avoids putting extra twists in the string/wire/cable), and for the big kites, the winder was rather smaller than the control handles. A bigger winder would allow me to wind
the string up (or let it out) faster, too.

Acrylic makes good kite winders - aha! A job for the Fab Lab!

A quick session with Inkscape gave me an outline, which I carefully arranged to be as big as the control handles would allow.

So, with the usual "set pen width to 0.05mm", "save as PDF", and "print to Epilog Laser", I had my first winder.

And it worked! (see "after" picture)

Saturday 22 May 2010

Making a fab Fab Lab Coaster


(excuse the pun, please)

This is an exercise in Computational Solid Geometry (CSG) - albeit in 2 dimensions.

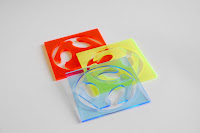
The Fab Lab logo is a nice combination of geometric shapes - crying out for scripting - it's a cube, with a circle on each face, projected through its longest diagonal axis to create a 2-D pattern, in turn inscribed in a circle...

In short, it looks like this:

So, I started scripting - draw a square (for a side of the cube), draw a circle in its centre, connect the circle to the edge; shear the square so it looks like the projected edge of a cube; rotate it 120 and 240 degrees to make the three visible sides; put it in a circle, joined up at the edges and with a square round the whole thing.

The scripting language is "python", using Neil Gerschenfeld's cad.py module for creating and manipulating the laser cutter.

Since this got a bit tedious, I exported an image (as a .png) and imported it into Inkscape so I could use a mouse to change the size and the properties.

So, if you see anyone in the Fab Lab using a neat logo as a coaster, now you know how it was created.

--

The script:

#
# define part
#

# FabLab Logo

# parameters - for unit-length side

chanwidth = 0.5 # width of channel in side of cube

cubeside = 0.95 # how much of circle to fill with cube

spokewidth = 0.05 # the three radial spokes

holesize = 0.6

lc = circle(0, 0, 1);

sc = scale_xy(lc, 0, 0, holesize);

spoke = rectangle(-spokewidth/2, spokewidth/2, -1, 0);

sq = rectangle(-1, 1, -1, 1);
chan = rectangle(-(chanwidth/2), (chanwidth/2), -1, 0);

hole = add(chan, sc);

side = subtract(sq, hole);

sside = move(scale_xy(side, 0, 0, 0.5), 0, 0)

# shear_x_y(part, y0, y1, dx0, dx1)

dx = 1/sqrt(3.0);

sh= shear_x_y(sside, 0, 1, 0, -dx)

clipper = rectangle(-2, 2, -0.433, .433)

tfside = intersect(sh, clipper) # this is now unit sided

rtfside = rotate(tfside, -30) # right side is vertical


face = add(scale_xy(move(rtfside, -0.433, -0.25), 0, 0, cubeside), spoke)

face2 = rotate(face, 120)
face3 = rotate(face, 240)
front = add(face, add(face2, face3))


def xor(p1, p2):
part = subtract(add(p1, p2), intersect(p1, p2))
return part

logo = xor(lc, front)

border = 1;

xstart = 0;
xmax = 2;

ystart = 0;
ymax = 2

def coaster(s): # square size in inches
cifrac = 0.9; # fraction of logo circle
xstart = 0
ystart = 0
xmax = s
ymax = s
logos = scale_xy(logo, 0, 0, cifrac)
part = xor(logos, rectangle(-1, 1, -1, 1))
parts = scale_xy(part, 0, 0, s/2)
parts = move(parts, s/2, s/2)
return parts

xstart = 0
ystart = 0
xmax = 4
ymax = 4

gik = coaster(3.5)


#
# define limits and parameters
#
cad.xmin = xstart - border # min x to render
cad.xmax = xmax + border # max x to render
cad.ymin = ystart - border # min y to render
cad.ymax = ymax + border # max y to render
dpi = 50 # low resolution for previewing
# dpi = 200 # high resolution for machining

nxy = int(dpi*(cad.xmax-cad.xmin))
cad.nx = nxy # x points to render
cad.ny = nxy # y points to render
cad.inches_per_unit = 1.0 # use inch units
cad.view('xy') # show xy view

#
# assign part to cad.function
#

cad.function = gik

Butterflies, butterflies, butterflies


Since it's spring, all sorts of beautiful creatures are springing to life. What is more evocative of a sunny spring day than a flock of butterflies?

I'd like to capture the essence of butterfly -- to bottle it -- and keep the idea alive over the winter, maybe by cutting out some butterfly images and sticking them on a canvas in my office.

So, I'm going to set up a laser cutter file to cut a few butterfly sillhouettes, on different colour cards, and see what they look like.
I started by looking for some butterfly outlines online - try a google image search like this:

Choose one of the images, click on it, and download it to your computer - use "See full size image" on the google result page, then control-click or right-click to get a menu that includes "Save as..."

Mine looked like the image at the right.

Now open up Inkscape - set your page size to the size of the card you are going to cut (mine was A4, and use the File->Import menu item to read in your butterfly image. It's probably the wrong size, so squeeze it and shape it until it looks about right. Don't worry about putting it in the right place yet - you'll see why in a moment.

The last thing we need to do before cutting the shape is to create paths for the laser to cut along - we want it to cut along every line that separates black from white in the image. The inkscape tool is "Trace Bitmap" - on the "Path" menu. Don't be tempted by the "Edge detection" button - use "Brightness cutoff". "Preview" will show you a speckly picture - don't worry, it'll all come right. Click "OK" (and remember that Inkscape has a wonderful "Undo" mechanism if something's wrong).

It looks as if nothing has happened - because
the new path is drawn on top of the image. Fortunately, the new path is already selected, so grab it, move it out of the way, and delete the image. Now move the path (which can be quite hard to see) into its final resting place, and set the object stroke and path correctly (no fill, black stroke, 0.01mm pen), and laser cut away!
If everything is right, you'll have a beautiful butterfly in your hand in a minute or so.

For mass production, I copied a few different shapes at a few different sizes onto a full A4 sheet like this, and then cut a few sheets of different colours at the same time.

Enjoy!


Friday 16 April 2010

Google Sketchup to Tea Light Holder in 12 Hours

This is a placeholder - bug me if you're interested, and I'll accelerate its production

Customizing Dad's Car - How to Delight a Three-Year-Old