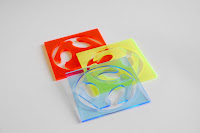
(excuse the pun, please)
This is an exercise in Computational Solid Geometry (CSG) - albeit in 2 dimensions.
The Fab Lab logo is a nice combination of geometric shapes - crying out for scripting - it's a cube, with a circle on each face, projected through its longest diagonal axis to create a 2-D pattern, in turn inscribed in a circle...
In short, it looks like this:

So, I started scripting - draw a square (for a side of the cube), draw a circle in its centre, connect the circle to the edge; shear the square so it looks like the projected edge of a cube; rotate it 120 and 240 degrees to make the three visible sides; put it in a circle, joined up at the edges and with a square round the whole thing.
The scripting language is "python", using Neil Gerschenfeld's cad.py module for creating and manipulating the laser cutter.
Since this got a bit tedious, I exported an image (as a .png) and imported it into Inkscape so I could use a mouse to change the size and the properties.
So, if you see anyone in the Fab Lab using a neat logo as a coaster, now you know how it was created.
--
The script:
#
# define part
#
# FabLab Logo
# parameters - for unit-length side
chanwidth = 0.5 # width of channel in side of cube
cubeside = 0.95 # how much of circle to fill with cube
spokewidth = 0.05 # the three radial spokes
holesize = 0.6
lc = circle(0, 0, 1);
sc = scale_xy(lc, 0, 0, holesize);
spoke = rectangle(-spokewidth/2, spokewidth/2, -1, 0);
sq = rectangle(-1, 1, -1, 1);
chan = rectangle(-(chanwidth/2), (chanwidth/2), -1, 0);
hole = add(chan, sc);
side = subtract(sq, hole);
sside = move(scale_xy(side, 0, 0, 0.5), 0, 0)
# shear_x_y(part, y0, y1, dx0, dx1)
dx = 1/sqrt(3.0);
sh= shear_x_y(sside, 0, 1, 0, -dx)
clipper = rectangle(-2, 2, -0.433, .433)
tfside = intersect(sh, clipper) # this is now unit sided
rtfside = rotate(tfside, -30) # right side is vertical
face = add(scale_xy(move(rtfside, -0.433, -0.25), 0, 0, cubeside), spoke)
face2 = rotate(face, 120)
face3 = rotate(face, 240)
front = add(face, add(face2, face3))
def xor(p1, p2):
part = subtract(add(p1, p2), intersect(p1, p2))
return part
logo = xor(lc, front)
border = 1;
xstart = 0;
xmax = 2;
ystart = 0;
ymax = 2
def coaster(s): # square size in inches
cifrac = 0.9; # fraction of logo circle
xstart = 0
ystart = 0
xmax = s
ymax = s
logos = scale_xy(logo, 0, 0, cifrac)
part = xor(logos, rectangle(-1, 1, -1, 1))
parts = scale_xy(part, 0, 0, s/2)
parts = move(parts, s/2, s/2)
return parts
xstart = 0
ystart = 0
xmax = 4
ymax = 4
gik = coaster(3.5)
#
# define limits and parameters
#
cad.xmin = xstart - border # min x to render
cad.xmax = xmax + border # max x to render
cad.ymin = ystart - border # min y to render
cad.ymax = ymax + border # max y to render
dpi = 50 # low resolution for previewing
# dpi = 200 # high resolution for machining
nxy = int(dpi*(cad.xmax-cad.xmin))
cad.nx = nxy # x points to render
cad.ny = nxy # y points to render
cad.inches_per_unit = 1.0 # use inch units
cad.view('xy') # show xy view
#
# assign part to cad.function
#
cad.function = gik


